Sunday 7 September 2014

Crunchy Granola


This recipe is inspired by my good pal Michelle who kindly supplied me with some Greek Yoghurt! I have been having such a hard time finding it in Dublin and she kindly shared some with me this week. I have been meaning to experiment with some granola for a long time and this is the perfect excuse! 
Granola is such a tasty snack however the shop bought ones are full of hidden sugar and salt. This one I think it very healthy and full of flavour from the toasted nuts, seeds and oats. It has a great combination of sweet and savoury crunch. 

The recipe below fills a 1.5kg Killiner Jar. 

Ingredients: 
225g rolled oats 
60g sunflower seeds 
60g pumpkin seeds 
80g crunchy linseed (I got mine in Lidl)  
60g flaked almonds 
60g pecans 
60g walnuts
50g desiccated coconut 
2 teaspoons of cinnamon 
1 teaspoon of ground ginger 
2 tablespoons of organic honey 
3 tablespoons of maple syrup 
2 tablespoons of sunflower oil 
Grated zest of one large orange 
100g of any dried fruit raisins / sultanas / dried cranberries / cherries 


Preheat the oven to 160℃. 

Mix everything together in a large bowl except the dried fruit raisins/sultanas. 
Spread the mixture onto a lined baking tray(s). 
Bake in the hot oven for up to 40minutes. Turn and toss the granola after 15-20minutes in the oven to evenly cook and toast the mixture. 
Once baked remove and leave to cool on the trays. If you add it to the container straight away the mixture will go soggy. 
Add in the dried fruits. I tossed in some dried cherries and cranberries into my batch. 
Store in a airtight container or Killiner jar for up to 2weeks. 


Enjoy with some Greek yoghurt for breakfast or an energising snack! 


Saturday 30 August 2014

White Chocolate & Strawberry Cheesecake


This cheesecake is the absolute bomb! If I ever decide to sell my food and make a business this is my number one go to never fail me recipe. It really is such a great crowd pleaser. The combination of gingernut biscuits, white chocolate and strawberries work really well together. I have also previously used raspberries in this recipe but I think the strawberries are a winner winner! 

I actually have found myself occasionally dreaming about and woke up craving it all day! It's a great 'pick me up' dessert and will always give you a little lift when you need it. 
To me it’s like a big hug! 

For this recipe I use white chocolate from Aldi and I use 2 full bars. The chocolate is of a high quality and it really brings through the flavour and sweetness. I have also used large amounts of milky bar white buttons to make this cheesecake but you do need a lot to carry through the flavour and the Aldi block of white chocolate works better. 

Anyway enough praise for now, it’s time for you all to see for yourself! It has taken me sometime to actually share this on the blog and I think this may be something to do with the fact that it is very precious to me and it was/is my signature cheesecake. 

Hope you enjoy, feel free to leave a comment!  

Ingredients: 
Biscuit Base: 
30 ginger nut biscuits 
75g butter 
2 tablespoons of golden syrup 

Filling: 
500g Cream cheese 
125ml double cream 
400g white chocolate 
20 strawberries to decorate   


Begin by heating the oven to 160℃.  
In a saucepan melt together the butter and golden syrup. Next break up all the biscuits in the plastic food bag with a rolling pin. Once they are like fine breadcrumbs mix together with the melted butter and golden syrup. 
Press down and flatten into a cheesecake tin. Bake in the oven for no more than 10minutes. Be careful it doesn’t burn. You just want to let the biscuits harden and set.  Remove from the oven and leave to cool for a little while in the fridge before adding the filling. 

Next in a heat proof bowl over hot water melt all the white chocolate. Make sure the water in the base of the saucepan is not touching the base of the bowl as it will burn the chocolate. Leave to melt on a very low heat for 4-5minutes. Once melted remove from the heat and leave to chill slightly. 

In a mixing bowl beat the double cream for 3-4minutes until thickened. Add in the cream cheese and beat lightly until thoroughly mixed together. Pour in the melted white chocolate and mix gently to a smooth consistency. Pour the filling on top of the biscuit base. Smooth out the surface with a palette knife. Slice the strawberries in half and decorate as you wish inserting them gently into the filing. Leave to set for at least 12hours in the fridge. 

Enjoy


Friday 22 August 2014

Fruity Flapjacks


This recipe was passed along to me from another Home Economics teacher and after a few attempts I have managed to perfect them. You need to be generous with the tablespoon of golden syrup in the recipe and it is important to slice into the flapjacks once removed from the oven to allow them to harden into the desired shape. I also sometimes like to melt some dark and white chocolate and drizzle it over the top of them once cooled. I've kept this recipe to the original healthy version.  

Ingredients: 
125g butter 
1 large tablespoon of golden syrup 
100g Caster sugar 
75g plain flour 
250g oats 
pinch of salt 
1/4 teaspoon of bread soda 
1 tablespoon of mixed seeds (flaxseeds, sunflower seeds)
2 tablespoon of raisins, sultanas and dried cranberries  

Preheat the oven to 170℃. 
Melt the butter and golden syrup together in a pot over a gentle heat. Once melted remove and leave to cool for a few minutes. 
Weigh the dry ingredients and mix them all together in a bowl. 
Mix in the melted butter and syrup and stir to coat all the ingredients. 
Transfer to a lightly greased square tin. Press down the mixture with the back of a wet spatula and flatten. Bake in a hot oven for 15-20minutes. 
Remove from the oven and cut into slices immediately on removing from the oven. 
Leave the flapjacks to cool for at least 10minutes before removing the slices from the tin.

Enjoy for breakfast or as a tasty healthy snack. 


Tuesday 19 August 2014

Wholesome Vegetable Soup

With the long evenings creeping in, autumn steadily upon us and being back to school the vegetable soup is firmly back in action and replacing the summery salads and light lunches.   

This soup is so easy to prepare. It’s packed full of your five a day, nutritious, warm, comforting, gluten free and best of all very easy to prepare. 

I like to make a large pot of this soup and use it for lunch in work or freeze it in lunch boxes. 
It is also very cheeky served with some of the caramelised onion bread featured on the blog. 


Ingredients 
1 onion 
3 carrots 
2 parsnips 
1 leek 
3 sticks of celery 
40g butter 
2 tablespoons of olive oil 
2 litres of homemade chicken stock 
Salt and freshly ground pepper 
Parsley

To serve: 
A little dollop of Cream 
Chopped chives 

I have been making soup for a long time and I used to be constantly disappointed, lashing in copious amounts of salt and pepper and deeming it tasteless time upon time.
Finally I discovered that the secret to a well flavoured successful soup is a good homemade stock. 
I like to make mine using the leftover carcess of the roast chicken boiled up with some celery, carrots, onions, rosemary, parsley, a bay leaf and a little garlic with lots of cold water. Once the stock begins to boil leave to simmer for a few hours and then sieve and discard the bones and vegetables. Freeze in small portions for ease of use. I use my chicken stock mostly for risottos or soup and there is a huge difference to the commercial stock cubes. The flavour is so much more intense and I also find you are less thirty due to the lack of salt from commercial stock cubes. 

That being all said you can obviously still use commercial stock cubes as they can be very convenient and it is not always possible to have fresh stock available to you! 

To begin dice up all the vegetables nice and finely. 

Keeping Paleo in mind I have removed the potato from this soup and the flour to thicken it and it works just fine! 

Begin my heating some oil and a little butter. 
Fry the onions only first and allow them to sweat and soften. 
Next add in the leeks, carrots, parsnips and celery and stir to coat all the vegetables. 
Continue to stir the vegetables for a few minutes to help evenly cook and avoid burning and sticking. Generously season with some salt and black pepper. Pour in the stock and turn up the heat to boil. Once the soup is boiling, reduce the heat, cover the soup and simmer gently for 15-20minutes. 
Blitz the soup in the blender and return to the heat to cook once more. 
Serve with some fresh cream and some chopped fresh parsley and chives. 


Monday 18 August 2014

Caramelised Onion & Sage Bread


This bread is from the Ballymaloe Collection and was made by Rachel Allen the day I visited the Cookery School this summer. Bread has always been my weakness. It is the one food that I always without fail tend to over indulge in at a meal! This bread was served fresh out of the oven in Ballymaloe and was so warm and comforting. It has a gorgeous crusty exterior and soft doughy inside oozing with the caramelised onions. This bread is served best warm with lashings of Kerrygold butter melting into it. 

I baked it recently for friends and it went down a storm served alongside some smokey bacon soup. It is so easy to make if you have an electric mixer and are patient and willing to let it rise slowly. 


Ingredients
215ml warm water 
1 teaspoon of caster sugar 
1 sachet 7g of fast action yeast
15g butter or 15ml olive oil (plus a little extra for greasing the tin)
350g strong white bread flour 
1 teaspoon of salt 

For the onion mixture 
2 tablespoons of olive oil 
800g peeled and sliced thinly white onions (7-8 onions)
Coarse sea salt and freshly ground pepper 
2 tablespoons of dried sage 

Loaf tin 12 x 23 cm (5 x 9inch) 


Begin my preparing the yeast mixture. Mix together the warm water, caster sugar, yeast and olive oil if using instead of the butter. Leave to sit in a warm place for 5-10 minutes until it foams. 

Sieve the flour and salt together into a large bowl. If using butter instead of oil rub into the flour now. Make a well in the centre of the flour and pour in the yeast mixture. Using the dough hook knead the mixture for up to 6-7minutes. If kneading by hand this can take up to 10 minutes. You know the dough is ready when it is smooth and springy to touch. Grease the bowl with a little olive oil and add the smooth dough back to it. Cover with cling film and a tea towel and leave to prove for 3-4hours at room temperature until it has doubled in size. 

Once the dough is rising you can start to make the onion mixture. Using a heavy based saucepan or good non-stick frying pan heat some olive oil. Add the very thinly sliced onions and stir coating the onions. Add in the sage and season generously with salt and freshly ground pepper. Cook the onions until they begin to sizzle, once this happens turn down the heat to the lowest setting and leave to cook for 1-2hours. Over the time they will begin to turn a lovely golden colour. Keep stirring every now and then to prevent sticking. Once golden remove the onions and leave to cool before adding them to the dough. 


When the dough has doubled in size tip the cooked onions over the bowl and punch the onion mixture into the dough. Transfer the dough onto a floured surface and tuck in any of the stray onions that may fall away. Shape the dough into an oval shape and add it into the oiled loaf tin. Brush the top of the loaf with a little olive oil and leave to prove once more for 30minutes in a warm environment covered with a tea-towel.

Preheat the oven to 220℃/Gas Mark 7. 

Place the loaf in the very hot oven and bake for 10minutes and then turn the temperature down to 200℃/Gas Mark 6 and continue to bake for 30-35minutes or until golden brown on top. 

When the loaf is cooked, it should remove easily from the tin and sound hollow at the base when tapped. Allow to cool completely (up to one hour) before slicing on a wire tray. 

Enjoy with some wholesome soup!  


Saturday 19 July 2014

Freshly Baked Fruity Scones with Homemade Strawberry Jam

Is there anything greater than the smell of freshly baked fruit scones?! My homemade strawberry jam from Bloom is finally making an appearance with these fruity buttermilk scones. 
Scones for me are a homely, comfort loving, hit the spot, maybe i’ll have just one more kind of food. I can’t remember when I had my first scone nor can I remember when I developed my keen love affair with these little beauties but they are always a winner for me! During my four years in St. Angela’s College Sligo there were a regular ‘hit’ in our somewhat glorious canteen. Home Economics teachers will know exactly what I am talking about here! :) 


Recently in one of my favourite blogs LovinDublin they voted quote ‘Hands down best Scones in Dublin - Keoghs Cafe’ on Trinity Street. While I am bias and I have yet to try these sensational ‘mouthwatering scones’ they do look (cough) quite on par to my humble fruit scones featured below. *Link to review (http://lovindublin.com/reviews/cafe/hands-best-scones-dublin-keoghs-cafe)*.  

This featured recipe is taken from Rosanne Hewitt Cromwell’s book Like Mam Used To Make. Take it from someone who buys cookbooks on a very regular basis and relies on them for my job that you can rarely find a cookbook where you fall instantly in love with everything about it. Every recipe in her book works. Every recipe is unique. It is my best buy recipe book. This book is a absolutely credit to her. I do not know how long it took her to complete but it is a beautiful work of baking art. As you may have already discovered I am a big fan. 

These are her Buttermilk Scones which I have adapted ever so slightly to my own taste. 

This recipe makes approximately 12 scones. 
Warning - they will not be around for long! 

Ingredients: 
450g plain flour 
1 tsp bicarbonate of soda 
1/4 teaspoon of salt 
85g caster sugar 
100g unsalted butter (cold, straight from the fridge)
280ml buttermilk 
1 teaspoon of vanilla extract 
75g mixed fruit (raisins & sultanas)
1/2 teaspoon of mixed spice  

Preheat your oven to 220DC/Gas Mark 7. Line two baking trays with parchment paper or grease with a little butter and a sprinkle of plain white flour. 
Sieve the flour, bicarbonate of soda, mixed spice and salt into a large bowl and stir in the sugar. 
Rub in the cold butter with your fingertips until it resembles breadcrumbs. 
Add the buttermilk, fruit and vanilla extract and mix until everything is all combined. Turn onto a lightly floured board and knead gently just to bring it all together. If it is too sticky add more flour to your work surface. Flatten the mixture to the same thickness of a scone cutter (3cm) and cut out rounds using a floured scone cutter. 
Place the scones evenly spaced on the prepared baking trays and brush the tops with the beaten egg. Finally I like to a cheeky tiny sprinkle to the top of each scone. 
Bake the scones in the preheated oven for 15-20minutes until risen and golden brown. 
Allow to cool on the baking trays for 5-10minutes. Serve with your jam, clotted cream and real butter. 
Bliss. 

Hope you enjoy :)


Rosanne also gives an important tip - when cutting the scones don’t twist the pastry cutter before removing it as this will stop the scones from rising properly! 


Pear & Almond Tart


I’m home from a once in a lifetime incredible trip to Sunny California where I had the best time treating my palette like a queen and sampling some of America’s finest food gems. 

Since I’ve come home from the States I’ve been flat to the max working for my second year at a Summer Camp “Smart Cooking” in Templeogue College for the past fortnight! Here I have been busy working with children and teenagers making everything from Swiss Roll to Lebanese Style Cous Cous. Needless to say I am very much back in the food zone again and dying to start baking and sharing some more dishes and recipes that I have picked up in the States and from my time in the Smart Cooking Academy Camp. 

The featured dish is a favourite of mine and I have ‘borrowed’ this recipe from the lovely Edward Hayden who I had the pleasure of meeting at the Taste of Christmas event back in 2012. His book ‘Food to Love’ is fantastic and a really staple go to book in my cookery book collection!   

This tart is a real crowd pleaser (serves up to 8people) and while it takes a little bit of effort I believe it is well worth it!       

I like to make the pastry a day in advance and leave to chill in the fridge to help speed up assembling the dish and to make the pastry easier to work with and roll. 


Ingredients: 

Sweet Pastry: 
300g plain flour 
110g caster sugar 
150g cold butter 
1 large free range egg 

There are loads of different ways to make your pastry. I am a traditionalist (and do not own a food processor) so I prefer the ‘Rubbing in’ Method. 
To begin, sieve the flour into a bowl, rub in the cold butter with your fingertips until it looks like fine breadcrumbs. Stir in the caster sugar. Beat the egg in a measuring jug and add to the mixture until it binds to form a dough. *If it does not bind together add a little cold water to help bring it together*. 
Wrap in cling film and leave to chill in the fridge for at least 30 minutes to rest and to help with ease of rolling. 


Using a 9inch/23cm flan tin, line with the chilled pastry and leave to chill in the fridge again for 20-30minutes to firm up and to prevent shrinkage at a later stage. Do not trim off excess pastry yet!  


Almond Sponge Filling Ingredients
175g soft butter  
175g caster sugar 
1/2 teaspoon of almond essence 
3 large free range eggs 
50g plain flour 
175g ground almonds  

Topping: 
6-8 canned pear halves (canned pears work best as they tend not to discolour during the cooking process) 
50g flaked almonds 
2 dessertspoons of apricot jam  

To serve: 
Vanilla Bean Ice-cream / Freshly whipped cream 

Preheat the oven to 180DC/Gas Mark 4. 
Cream together the soft butter and caster sugar and add in the almond essence to give a strong intense almond flavouring. Cream until light and fluffy. (This may take up to 5minutes depending on how soft the butter is). 
Next add in each of the 3 eggs one at a time and beat well after each. Sieve in the ground almonds and flour together and mix until everything is combined. 
Pour the wet mixture on top of the pastry lined tin until it is completely covered. 
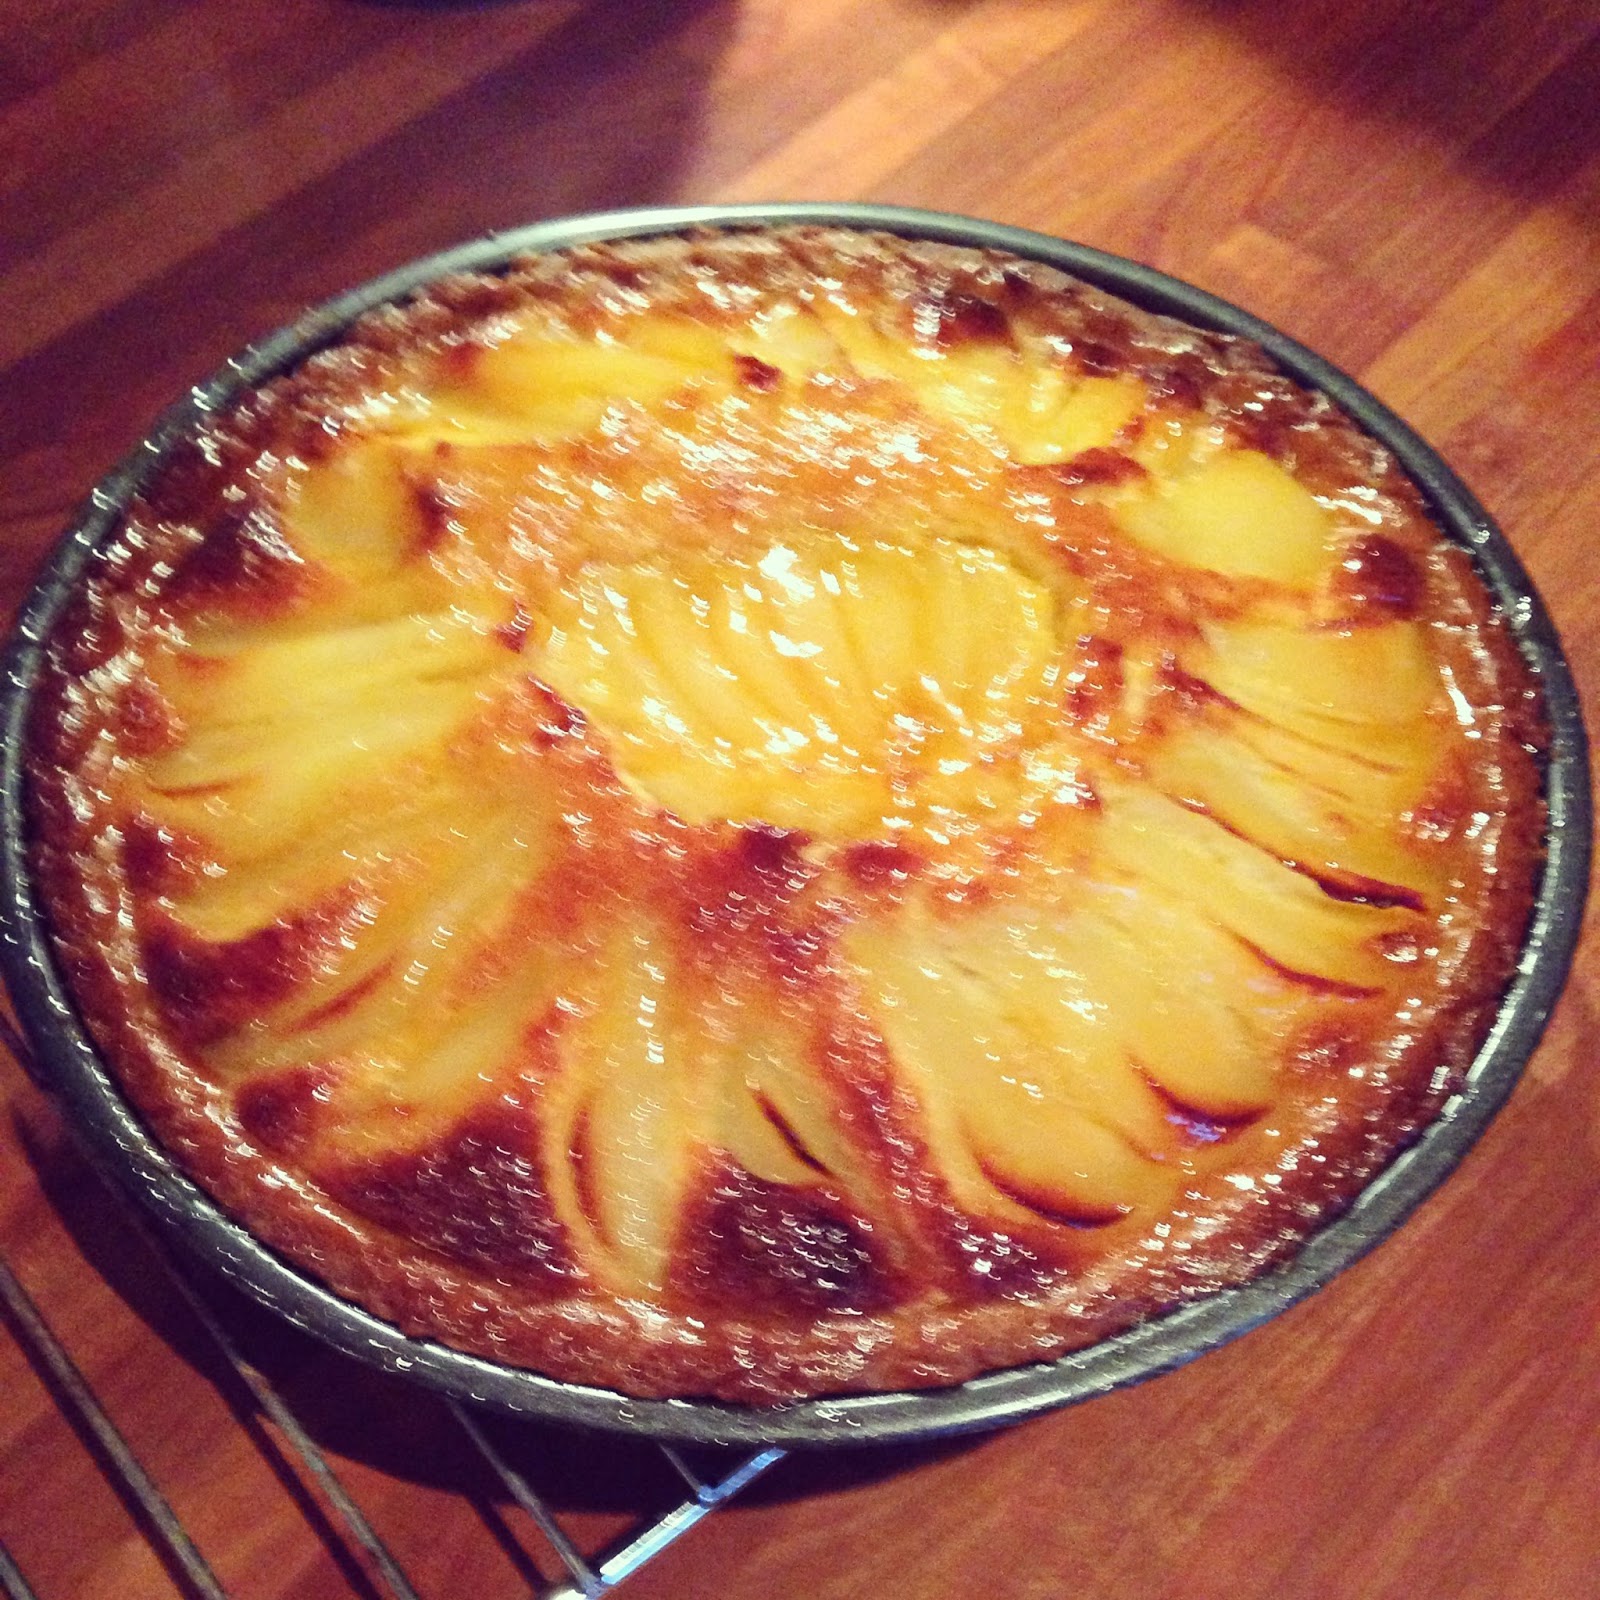
Next carefully slice the pear halves thinly and place round side upwards on top of the almond sponge keeping them at best in their original shape. Trim off any excess pastry that may be hanging over the edge of the flan tin. You can make an indent on the edge of pastry using the back of a fork or using a crimper. 
Bake in the oven for 35-40minutes until it has a nice golden brown colour. By this stage your kitchen will smell incredible! 
After the tart has cooled completely (20-30minutes) remove it from the tin and place on a serving platter. 
Heat the apricot jam with about 2 tablespoons of boiling water in the microwave. Sprinkle some lightly toasted flaked almonds.  
Brush the tart with the boiled jam and serve alongside some vanilla ice-cream or freshly whipped cream. 


Hope you enjoy!